EHR STATUS PAGE - CHECK FOR OUTAGES BY CLICKING THIS LINK (opens in a new tab)
Charting Issues
Charting on the Wrong Patient
When working a ticket that involves moving cases between patient accounts, MRN 1 will serve as the MRN that holds the cases needing to be moved and MRN 2 will serve as the MRN that will have the cases moved in to it
-
Search MRN 1 provided that it has the case(s) that don’t belong to the correct patient.
-
Review the reported case(s) that are needing to be moved to confirm that the/all incorrect case(s) are being accounted for
-
Confirm that MRN 2 is able to be located within the EHR
-
Once you’ve confirmed the case(s) needing to be moved from MRN 1 to MRN 2, contact your organization's privacy team per your current policies to inform them of the error. The privacy team will then submit a ticket to support to move the necessary details.
Unable to Add New Care Plan
- Click on the appointment card of the visit and click View Details
- Verify that the visit is not marked as “Canceled” or “No-show”
- Having a visit marked as such will cause the chart attached to the visit to become hidden from view in the case. To view a canceled or no-show visit’s chart, click “All” on the “All/Active” toggle located within the case’s title banner.
- If this may be the case, un-cancel or undo the No-show for the appointment so that the chart surfaces in the case
- If you are unable to un-cancel the appointment or undo the no-show, submit a ticket to Carbon Support (opens in a new tab)
- Then click on the “Today’s chart” button
- Once in the view of the chart, check to verify that visit documentation has occurred on the chart, and not via addendum
- If charting has occurred properly and you see the Care Plan field surfaced within the chart, click the Add New button.
- If you get a reaction from the button and are able to fill out a care plan, then fill in the New Care Plan
- If you don’t get a reaction from the button, take a Demo mode screen recording/video with the Inspect Tool (opens in a new tab) window open, showing that there is no reaction from the “Add New” button in the Care Plan.
- If charting has occurred properly and you see the Care Plan field surfaced within the chart, click the Add New button.
- Once you have reviewed the video and no PHI is included and bug behavior is displayed, please email icook-ehr-support@carbonhealth.com. Be sure to include the screen recording or video in the email.
NOTE: If the chart is signed off, you can only add a care plan via addendum. Click "Add Addendum" and you can add a new care plan.
Unable to Delete Incorrect Results
- If the chart is locked, ask that the rendering provider or a supervising physician unlock the chart
- If/once the chart is unlocked, navigate to the section of the case where the results are posted
- Long hold on the results to surface the option to delete
- Once the results are succesfully deleted, the provider or clinic staff should re-enter the results correctly.
- NOTE: This will send a new in-app message to the patient with the updated results.
- If you receive an alert that the results can not be deleted because they have already been billed, submit a ticket to Carbon Support (opens in a new tab)
- If you are not given the option to delete, submit a ticket to Carbon Support (opens in a new tab)
- Once the results are succesfully deleted, the provider or clinic staff should re-enter the results correctly.
Unable to Edit or Save Care Plan
- Click on the appointment card or calendar icon of the visit and click “View details”
- Verify that the items under Check in and Triage have been completed.
- Confirm that the visit is not marked as “Canceled” or “No-show”
- Having a visit marked as such will cause the chart attached to the visit to become hidden from view in the case. To view a chart that has been canceled or no-showed, click “All” on the “Show: All/Active” toggle located at the very top of the chart.
- Next, check to see if the visit has already been signed off/locked
- Care plans cannot be edited if the chart is locked
- Click on the button, “Today’s chart”
- Once in the chart, check to verify that visit documentation has occurred on the chart, and not via an addendum
- If the Care Plan was added to the case via an addendum, the provider will need to add the Care Plan to the actual visit.
- If charting has occurred properly and the Care Plan is within the chart/visit section, please provide a video or screen recording while in Demo mode to avoid PHI with the Inspect Tool (opens in a new tab) window showing that there is no reaction when the Edit or Save buttons are pushed.
- Once you have reviewed the video and no PHI is included and bug behavior is displayed, please submit a ticket to Carbon Support (opens in a new tab). Be sure to include the screen recording or video in the email.
Unable to Submit Orders
- Only licensed providers can Submit Orders, ensure that the user attempting to press that button has a License and Credential on file in their staff account.
- NOTE: If there are medications in the care plan, the user attempting to click Submit Orders must also have a Surecripts ID (SPI) number in their staff account.
- If the person attempting to click
Submit Ordersis a valid provider and is still experiencing problems submitting orders, delete and re-enter the orders. - If after that the orders are still unable to submit, take a screen recording while in DEMO mode with the Inspect Tool (opens in a new tab) open, and press the Submit Orders button to show there is not reaction
- Once you have reviewed the recording and there is no PHI and the Inspect Tool window is open, submit a ticket to Carbon Support (opens in a new tab). Be sure to include the screen recording or video in the email.
Unable to Publish the Care Plan
-
Only licensed providers can Publish a Care Plan, ensure that the user attempting to press that button has a License and Credential on file in their staff account.
- NOTE: If there are medications in the care plan, the user attempting to click Publish Care Plan must also have a Surecripts ID (SPI) number in their staff account.
-
If everything is correct and it is not letting you click “publish care plan”, please provide a video or screen recording while in Demo mode to avoid PHI with the Inspect Tool (opens in a new tab) window showing that there is no reaction when the “Publish Care Plan” button is pushed.
-
Once you have reviewed the video and no PHI is included and bug behavior is displayed, submit a ticket to Carbon Support (opens in a new tab).
Unable to Save Edits in MDM
- First, refresh the app and try filling in and saving the MDM again.
- If that does not work, confirm the date of service of the appointment where you want the MDM to be.
- Depending on where you are at in the app, bring up the appointment details from that visit. You can do this in the Patient Search tab by first searching for the patient, then clicking on the appointment card or calendar icon of the visit, and then clicking, “View details”.
- Check to see if the bill has been finalized. You can do this by clicking on the three dots in the upper right corner of the appointment details tab and then selecting “Review bill”. Alternatively, you can select “Review Bill” under “Checkout”.
- If the visit has already been finalized, no further MDM edits can be made and saved.
- Note that all bills are finalized after 72 hours.
- At this point providers can add a new Narrative Medical Decision Making (MDM) through an addendum. After clicking on “Add addendum”, click on “Add to chart” in the lower left corner, search for “Narrative Medical Decision Making (MDM)” and add it to the chart. Providers will then be able to add the necessary details to this section. If you need further assistance, please contact your clinician manager.
Unable to Upload X-ray Images or Reports
- Once the x-rays have been performed, click on “Record Image Capture” seen to the right of the x-ray order in the care plan. This will inform all clinic staff that images have been captured and results are pending.
- Notice after clicking on it, the action changes from “Record Image Capture” to “Upload Results”.
- Once the images and report are ready, click on “Upload Results” in the care plan. After uploading the files and clicking “save”, the button will change again from “Upload Results” to “See/Update results”.
- However, if you notice that the app timed out (where after you hit save, nothing happened), exit out of this section, refresh the Provider App and try uploading the images and report again.
- If you need to delete any results, locate them below the care plan. Long press and hold on them and a window of options will pop up at the bottom with one of them being the option to delete.
- Another potential issue is file size. Confirm that the file size for each image and report is not over 7MB. This is the maximum file size (per file) that can be uploaded into the Provider App. Anything larger will need to be broken up into multiple files.
- To check the size of a file, use the Finder application on the device.
- If the incomplete order status persists, provide a screen recording while in DEMO mode to avoid PHI of you going through the workflow with the Inspect Tool (opens in a new tab) open and escalate for further assistance.
- Please submit a ticket to Carbon Support (opens in a new tab). Be sure to include the screen recording or video in the email.
Macros
Macros Not Loading or Saving
To enter Demo Mode on the Provider App: Click on Settings while in the Provider App → scroll down to your account section → click the Demo Mode toggle so that it turns green. Green will indicate that Demo Mode is on
To take a screen recording on a laptop: Hold down the Command + Shift + 5 keys altogether and click the screen you would like recorded. Click here (opens in a new tab) to be directed to Apple’s directions
To take a screen recording on an ipad: Swipe on the screen for the Control Center, and click the record button. Click here (opens in a new tab) to be directed to Apple’s directions
To take a screenshot on a laptop: Hold down the Command + Shift + 4 keys altogether and with your cursor, click and drag the cursor across the area of your screen that you would like to capture an image of
-
Search the MRN and click on the patient’s account
-
Confirm what macro you should be on the look out for and the information that it is supposed to have, and verify if the macro was uploaded to the specified case or date of service in question
-
If the macro is uploaded and you’re able to view it, complete a hard refresh and try to edit and save the macro again
-
If the macro is not showing in the chart, verify which field (ex. HPI, ROS, PE) you are wanting to apply the macro to and what the macro is titled, and search for that macro within that field yourself from a test account. You will need to reproduce the workflow by using a test account as part of your investigation. If you are unsure of the workflow, follow the steps below:
-
If you are able to view the macro within the field from your test account, go back to the patient’s account and specific case/date of service, click the Add to Chart button and search for the field you are wanting to apply the macro to.
- Once you get the field added to the patient’s chart, search for the macro and click it, then click Save to the field.
- If you are able to get the macro to save into the field it will show under your name and in case you need to add additional information, you may do so.
- Delete the original field that could not have the macro save to it and proceed to step 5
-
If you are not able to get the macro to save into the field you just added to the patient’s chart, take a Demo mode screen recording with the Inspect tool window (opens in a new tab) open of you trying to apply the macro and save to the field.
-
-
Once you have reviewed the video and no PHI is included and bug behavior is displayed, submit a ticket to Carbon Support (opens in a new tab)
How to Delete a Macro
- Locate your macros at the top of the section you are in.
- Long press on the macro you wish to delete.
- The options “Delete” and “Cancel” will populate at the bottom of the screen.
- Select Delete.
Medical History
Allergies Issue
-
Search the MRN and click on the patient’s account
-
Confirm what information is needing to be added, and verify that the information attempting to be added to the patient’s account is not there
- If the information is recorded in the Medications tab, confirm that no further assistance is needed
-
If the information wanting to be added is not under the Medications tab, enter it through the Medications tab and not through the Medical History tab
- Click the +Report
- Select with to Report Medication or Report Allergy
- See Video (opens in a new tab) on how to add a medication or allergy.
- This would also be how to add in current medications the patient is taking as well.
-
If you are not able to add in the current medications and/or medication allergies under the Medications tab take a screen recording/video while in Demo Mode with the Inspect Tool (opens in a new tab) window open showing the Save button has no reaction.
-
Once you have reviewed the video and no PHI is included and bug behavior is displayed, submit a ticket to Carbon Support (opens in a new tab)
Visit Workflow
Unable to Check-In Patient
Ensure that the following fields are all completed:
- Patient information
- Gender assigned at Birth
- Specialty
- Responsible party
- Subsequent required fields after responsible party indication such as collecting a card, charging for the visit, and patient balance
- Consent forms IMPORTANT: ALL of those sections MUST have a green check mark next to them, in order for the Complete check in button to appear
If the all the required check in items have been completed and check in is still not available, submit a ticket to Carbon Support (opens in a new tab)
No external or internal published TreatmentPlan found
See video (opens in a new tab)
If you see the Error Message: "No external or internal published treatment plan found. Submit orders or published treatment plan."
- Click Ok on the Error Message
- Navigate Back to Today's Chart
- Two Options to Resolve the Error:
- Option 1: If not ready to send care plan to patient yet, click "Submit Orders" button for internal publish
- Option 2: If ready to send care plan to patient, click "Publish to Patient" button
Purpose of Error Message: Requires either "Submit Orders" or "Publish Treatment Plan" to proceed
Outcome: After choosing an option (Submit Orders or Publish Treatment Plan), clicking "Ready for Checkout" will allow you to proceed.
Unable to Click Ready for Checkout (Finish Visit)
- Check to see what error message you are receiving when trying to click Ready for Checkout.
- If the message states “Care Plan needs to be added” then make sure that the Care Plan within the chart is attached to the encounter and is not entered via an addendum. You can identify an addendum by the lack of information seen in the red circle within the pictures below. Note that no appointment time is indicated as well as a provider, a clinic and a specialty.

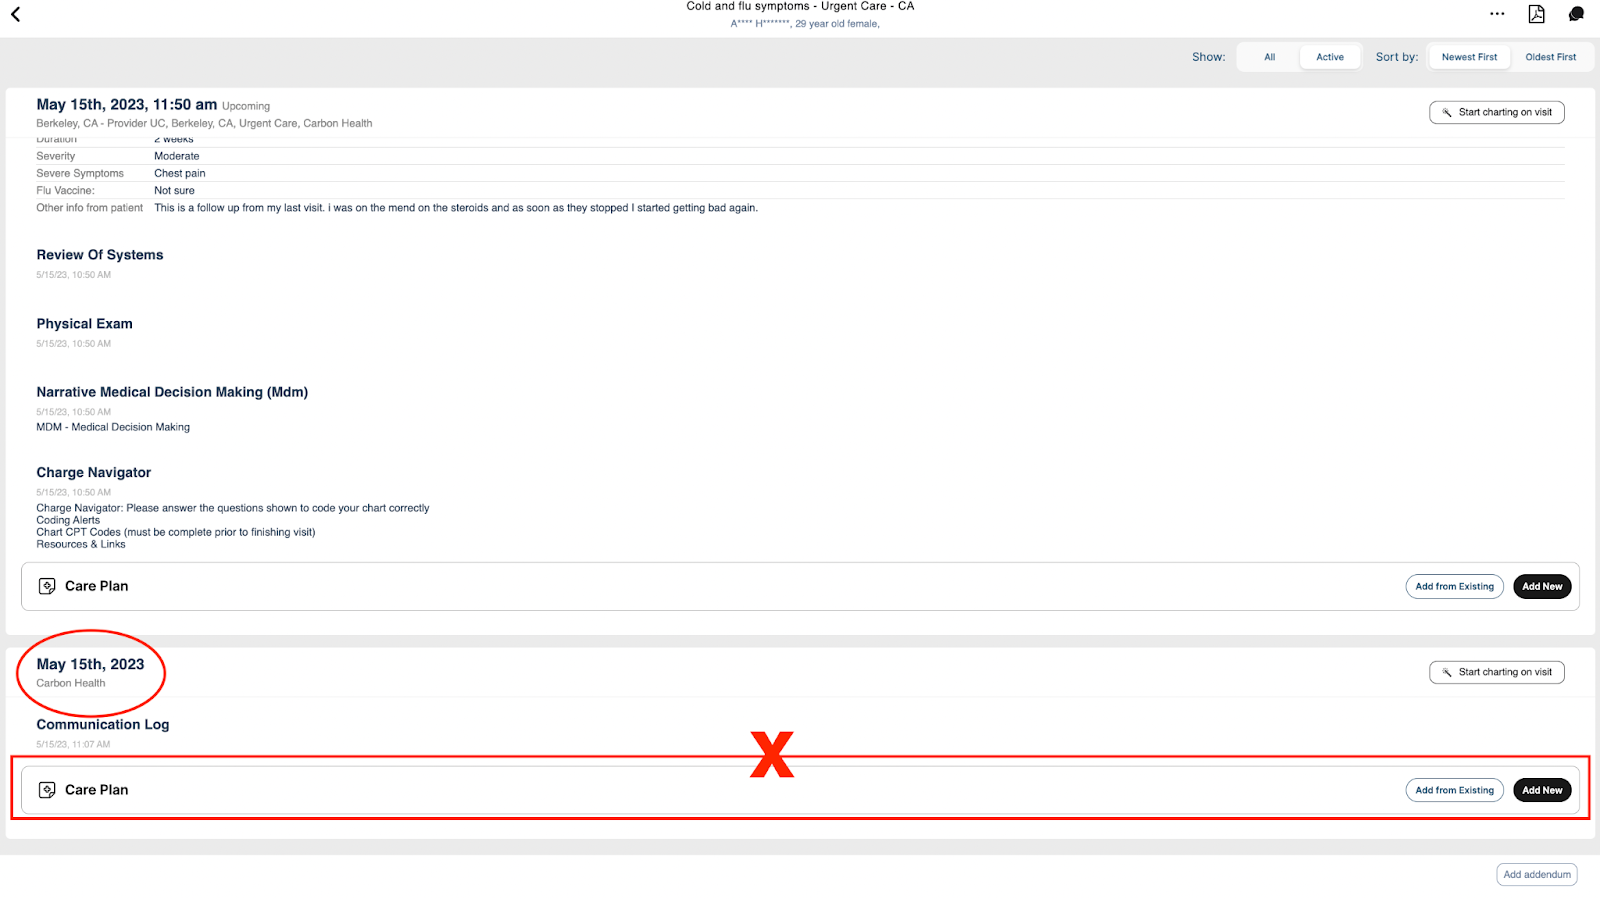
- If Care Plan is added via addendum and it is the same day of the visit, then the provider has to select the “Start charting on visit” button on the chart and re-document correctly by using the Care Plan field located on the chart. The below image is what the chart will look like when the charting is done correctly.
- You can see in the large green circle below, there is an appointment time slot next to the date, assigned provider, clinic location, and specialty, and visit status all listed.


-
If any charting sections need to be moved to the correct visit from the addendum, you will long click and select “Move to different appointment”. Verify the correct appointment date, time, and complaint this information needs to be moved to before moving it. Once moved, verify the information is visible in the correct case.
-
If all of the above has been checked and you are still unable to click Ready for Checkout, submit a ticket to Carbon Support (opens in a new tab)
Unable to Finish Visit because of X-ray Order
-
Review the x-ray order in the Care Plan and ensure that the clickable fields like Modality, X-ray Category, X-ray Location, and subsequent fields all have options selected
-
Try the following
- Delete the images uploaded, report uploaded, and the imaging order from within the Care Plan
- Then refresh your Provider Web App, this can be done by pressing the Cntrl + Shift + R keys altogether at the same time
- Then load the x-ray order into the Care Plan again, and upload the imaging and report as normal
-
In the insistence that you are unable to finish the visit because of the x-ray order after step 2, please provide a video or screen recording while in Demo mode to avoid PHI with the Inspect Tool (opens in a new tab) window showing that there is no reaction when the Save button is pushed.
-
Once you have reviewed the video and no PHI is included and bug behavior is displayed, submit a ticket to Carbon Support (opens in a new tab)
Unable to Schedule Follow-up Appointment
-
Go to the patient’s chart with the care plan that contains the Follow-up Appointment.
-
Open up the care plan into the edit view and click on the follow up appointment.
3 Check that the Follow-up appointment has met the following requirements:- Has an approximate appointment time frame
- Has a specialty listed
-
If the Follow-up appointment does not meet the criteria listed above, there will be a failure with trying to schedule the appointment. After you recognize what requirement is missing, go ahead and update the Follow-up appointment details.
-
If the Follow-up appointment meets the criteria listed above and you are still unable to book an appointment, provide a screen recording while in DEMO mode to avoid PHI of going through the workflow with the Inspect Tool (opens in a new tab) open and escalate for further assistance.
-
Once you have reviewed the recording and there is no PHI and the Inspect Tool window is open, submit a ticket to Carbon Support (opens in a new tab). Be sure to include the screen recording or video in the email.
Unable to Sign Off on Visit
A modal will appear that alerts the provider as to why they cannot sign off
Verify that the following items have been completed:
- Internal Labs collected & resulted
- Internal Imaging captured
- Orders / Tests completed
- External Labs collected (if ordered with PSC toggled off)
- All Care Plans have been added and published to the appointment charting section
- Charge Navigator is fully completed
- Billing Provider is selected
- Supervisor is selected (if provider is not a supervisor themselves)
- Open up the appointment details tab for the chart you are trying to sign off
- Confirm you are the one assigned to the chart. To confirm this, look at the very top of the appointment details tab (left screen). If you are not, assign yourself to the visit.
- Next, in the appointment details tab, confirm that each section and their subsections are completed:
- Check-in
- Triage
- Orders (if placed)
- Visit details
- “Assign Billing Provider”
- “Assign Supervisor” (to verify whether a provider requires a supervisor or not, go to their staff account and look under the ‘Provider Profile’ section for ‘Requires Supervisor’. Toggled on means that a Supervising Provider needs to be assigned to the chart.
- Tx (Care Plan)
- Checkout
- Book Follow Up Appointment - if a follow up was added to the care plan, this item becomes a required field.
- Click on “Today’s chart”
- If the Care Plan was added to the case via an addendum the rendering provider of the visit will need to add the Care Plan to the main chart.
- How to distinguish between the main chart and an addendum:
- The main chart will have the date and time of the appointment, the rendering provider listed, and the location of the clinic. An addendum will only have the date of when it was created in the case
- How to distinguish between the main chart and an addendum:
- If it was confirmed that the visit notes were added to the case via an addendum, all items except for the care plan can be moved by a long press and hold gesture. Long press and hold on each section. Then a window will pop up with an option to move the item to a different appointment. Next, select the case that matches the date and time that the visit occurred and select it. Move over all items that you are able to by repeating the long press and hold gesture.
- The rendering provider of the visit will need to add a new Care Plan to the main chart. This can be done by clicking “Start charting on visit” and then “Add New”. Since the other care plan exists, a potential time saving option is to click on “Add from existing” and you will be able to carry over information from the existing Care Plan.
- If the provider is still unable to sign off, provide a screen recording while in DEMO mode to avoid PHI of going through the workflow with the Inspect Tool (opens in a new tab) open and escalate for further assistance. open and escalate for further assistance.
- Once you have reviewed the recording and there is no PHI and the Inspect Tool window is open, please submit a ticket to Carbon Support (opens in a new tab). Be sure to include the screen recording or video in the email.
Misc.
To enter Demo Mode on the Provider App: Click on Settings while in the Provider App, scroll down to your account section, and click the Demo Mode toggle so that it turns green. Green will indicate that Demo Mode is on. This Loom video demonstrating how to enable Demo Mode can also be sent to reporters - linked here (opens in a new tab)
To take a screen recording on a laptop: Hold down the Command + Shift + 5 keys altogether and click the screen you would like recorded. Click here (opens in a new tab) to be directed to Apple’s directions
To take a screen recording on an ipad: Swipe on the screen for the Control Center, and click the record button. Click here (opens in a new tab) to be directed to Apple’s directions
Add a Default Supervisor
Staff can add a default supervisor to their account for visit details and prescription purposes
Setting a Default Supervisor will eliminate the extra steps to choose one for every encounter
To set a default supervisor:
- Click the Settings gear icon
- Click Account
- Scroll to the section Default Supervisor
- Click into the row and search for your Supervisor
- Select their name
- Press Save in the top right corner
Supervising Chart Calculations and Reviews
Overview:
There is an option within the Provider App (EHR) that allows leadership to choose a calculated amount of charts to be audited by a supervising doctor for each provider. The two calculated options are a “Fixed number (Monthly)” and a “Percentage (daily)”.
If the option, “Fixed number (Monthly)” is selected, clinic leadership will type in the amount of charts per month for that one provider that they would like to be randomly assigned to and reviewed by a supervising doctor. If the option, “Percentage (daily)” is selected, clinic leadership should pick the percentage of charts per day that they would like to be randomly assigned to and reviewed by a supervising doctor.
- In Staff Settings, there is a toggle that says Requires Supervisor
- Toggle this on as TRUE if that staff account needs to have a supervisor to review their charts
- In Staff settings, set a Supervising chart calculation type
- Fixed number (monthly)
- Choosing this option means that a certain number of charts that this staff account was the rendering provider for will be selected for review by the Supervising provider
- Percentage (daily)
- Choosing this option means that a percentage of charts for a single day that this staff account was the rendering provider for will be selected for review by the Supervising provider
- Fixed number (monthly)
- In Staff settings, set a supervising chart calculation value, based on the type above
- In the visit details, there is a row that says Assign Supervisor, staff will need to select a supervisor for every visit
- Based on the supervisor selected for that particular visit and the type and value indicated in that staff settings, a task will be generated
Scenario examples:
Example 1:
- John Smith PA requires a supervisor
- In John’s staff settings, it’s indicated that Fixed number (monthly), 10 charts need to be reviewed
- In August, John is the rendering provider for 1,000 visits
- On September 1st, 10 random charts of the 1,000 he saw will require review
- In 5 of the visits he chooses Dr. A as the supervisor and in 5 of the charts he chooses Dr. B as the supervisor
- Dr. A will receive an automatic task to review said 5 charts
- Dr. B will receive an automatic task to review said 5 charts
Example 2:
- Sally Doe NP requires a supervisor
- In Sally’s staff settings, it’s indicated that Percentage (daily), 50% charts need to be reviewed
- On September 27, Sally is the rendering provider for 30 visits
- On September 28th, 15 random charts of the 30 she saw will require review
- In 15 of the visits she chooses Dr. A as the supervisor and in 15 of the charts she chooses Dr. B as the supervisor
- Dr. A will receive an automatic task to review said 15 charts
- Dr. B will receive an automatic task to review said 15 charts
Scanning Documents
- It is important to note that any document which may need to be emailed, faxed, printed or otherwise extracted from the Provider App in the future should be scanned into the patient’s chart instead of capturing it by photo as photo quality is severely diminished when performing the above actions.
- The Provider App (EHR) does not support TIFF files.
- Prior to scanning, go into the Scanner’s settings and choose how the scanner should save the document. The preferred file type is .PDF, otherwise .PNG is also a sufficient option.
- If you have already scanned the document, export it as a .PDF or .PNG before uploading it to the Provider App.
Provider App Updates
The team at Carbon Health is continually improving the app and pushing updates to the iPads when they are ready.
If while using the Provider App, you see a yellow banner at the top of the screen indicating that it is ready to be updated, please press it as soon as possible to ensure you are using the most up to date version
Email Address in Use
If an email address already exists within the Provider App, teams may come across the alert “That email address is already in use”. This is usually the case if the patient has a duplicate chart, or if they had a family member who was seen as a patient, use the same email address. With the exception of family accounts, an email address can only exist in a single patient chart.
- Step 1: In the Patient Search tab, type in the email address in the search bar to discover which chart houses the email address.
- Step 2: If the patient has a duplicate chart, merge the charts.
- Step 3a: If it is discovered that the patient had a family member use their email address, teams will need to determine if a family account should be created, or if email addresses need to be added/updated on both charts.
- Step 3b: If the patient is the parent to that member AND that patient is under the age of 18, the patient can request that a family account be created. Email support for assistance with this task and educate the parent on how they can add additional children to their account in the future as this is the easiest and most effective way to add family members.
- Step 3c: If the family member is over the age of 18, they will need to have their own account and that includes their own email address on file.
Things to note:
- Due to the various privacy regulations, only one individual over the age of 18 can be on a family account, and that will usually be the parent or legal guardian.
- An exception to the rule: If the patient is over 18 and their care is being managed legally by another adult (in the instance of disability or Power of Attorney), the patient can be a part of the guardian’s family account. However, the legal guardian must provide documentation proving that they are responsible for the patient. Once proof has been given, upload it to the patient’s chart, and send a request to Support asking to create a family account.
Employee Unable to Log In
- Have the employee go to provider.carbonhealth.com
- Enter their email
- Click Forgot Password
- Enter the confirmation code
- Enter a password that fits this criteria:
- 15 characters
- A capital letter
- A number
- A special character
- Click Set Password
NOTE: If the employee receives an error after step 6, have them do a complete refresh of the webpage.
After the refresh, have the employee log in using the new password they just created.
If the employee receives a Login Failed message, have them follow these steps:
- Open an incognito window in your browser (file, new incognito window)
- Go to provider.carbonhealth.com
- Enter their email
- Enter their new password
- Log In
If the employee receives a Login Failed message here, please submit a ticket to Carbon Support (opens in a new tab)
If the employee is able to successfully log in while in cognito window, please have them follow these steps to fix the regular chrome browser:
- In Chrome, click History
- Select Show Full History
- Click Delete Browsing Data
- Ensure the following boxes are checked
- Cookies and other site data
- Cached images and files
- Select Delete Data
- Open a new tab for provider.carbonhealth.com
- Log in with the email and new password